If you bought a camera that is more serious than a regular soap dish, then most likely you will want to master the manual settings (although they can also be found on soap dishes). And I would even advise you to do it as soon as possible, so that even if you shoot in automatic mode, you will understand what is happening..
The main parameters on the camera that you will control are few, but they are all closely interconnected: shutter speed, aperture, ISO, white balance. There is also such a parameter as depth of field (depth of field), which itself is not set in any way, but it turns out due to other parameters. I'm afraid for the first reading all this will seem too complicated and scary, but here I can only advise you how to try as much as possible at first. Shoot the same shot with different settings and then see what happens, look for relationships, analyze. And do not forget about the instructions for the camera, this is practically a reference book at first..
The content of the article
- one All parts of my Beginner Photographers FAQ
- 2 Excerpt
- 3 Diaphragm
- 4 ISO sensitivity
- five White balance
- 6 Focus point selection
- 7 Depth of field DOF
- eight Relationship between shutter speed, aperture, ISO and semi-auto modes
All parts of my Beginner Photographers FAQ
one. Which camera to choose for a novice photographer
2. What lens is needed for what and what to choose
3. Basic settings of the digital camera
4. How to take travel photography
five. How to process photos in Lightroom and how to store them
6. Example of a photo bag and travel backpack
7. How to photograph the starry sky
0. What I photograph when traveling
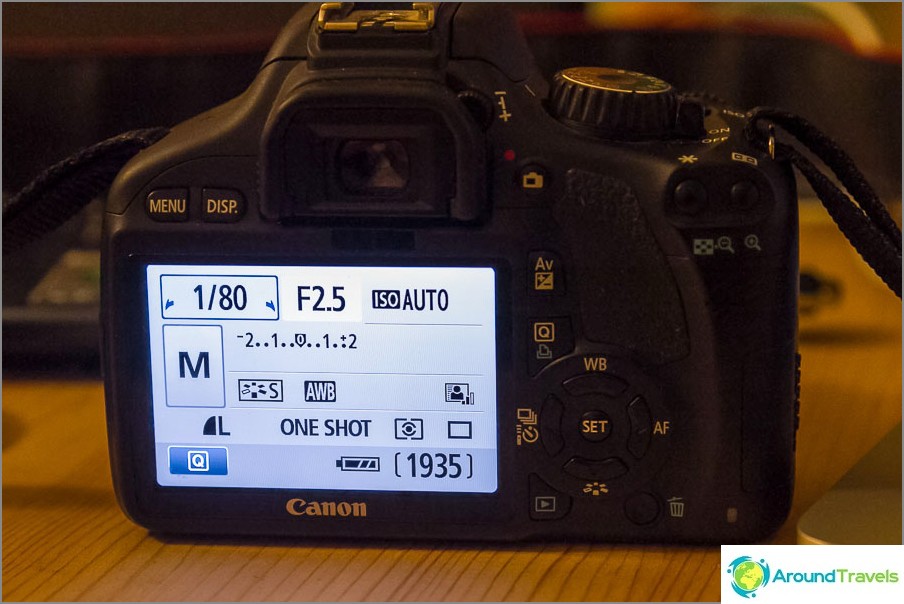
The main settings for a digital camera are shutter speed and aperture, their ratio is called exposure. Therefore, when they say you need to choose an exposure, they mean that you need to set these two values..
Basic Digital Camera Settings
Excerpt
Changes in seconds (1/4000, 1/125, 1/13, 1, 10, etc.) and means the time for which the camera curtain opens when the shutter is released. It is logical that the longer it is open, the more light will enter the matrix. Therefore, depending on the time of day, the sun, the level of illumination, there will be its own exposure parameter. If you use automatic mode, the camera itself will measure the light level and select the value.
But not only the illumination is affected by the shutter speed, but also the blur of a moving object. The faster it moves, the shorter the shutter speed should be. Although in some cases, you can, on the contrary, make it longer in order to get «art» lubrication Likewise, lubrication can come from shaking your hands (shaking), so you should always choose such a value to neutralize this problem, well, and train so that shaking is less. A good stabilizer on the lens can still help you with this, it allows you to use longer shutter speeds and prevents wiggle..
Exposure selection rules:
- To prevent hand shake blur, always try to set your shutter speed no faster than 1 / mm, where mm is the millimeter of your current focal length. Because the larger the focal point, the greater the chance of blur, and the more you need to shorten the shutter speed. For example, the cut-off value for 50 mm will be a shutter speed of 1/50, and it would be even better to set it even shorter, somewhere around 1/80, so that for sure.
- If you are shooting a person walking, the shutter speed should be no slower than 1/100.
- For moving children, it is better to set the shutter speed no slower than 1/200.
- Very fast subjects (for example, when shooting from a bus window) require very fast shutter speeds of 1/500 or less.
- In the dark, to shoot static objects, it is better not to raise the ISO too much (especially above the working value), but use long exposures (1s, 2s, etc.) and a tripod.
- In case you want to shoot beautifully flowing water (with lubrication), then you need 2-3 seconds exposure (I don't like what happens longer). And if you need splashes and sharpness, then 1/500 - 1/1000.
The values are all taken from the head and do not pretend to be axioms, it is best to select them yourself on personal experience, so this is just a guide..
Shutter speed 1/80 is too long for such movements, it turns out blurry
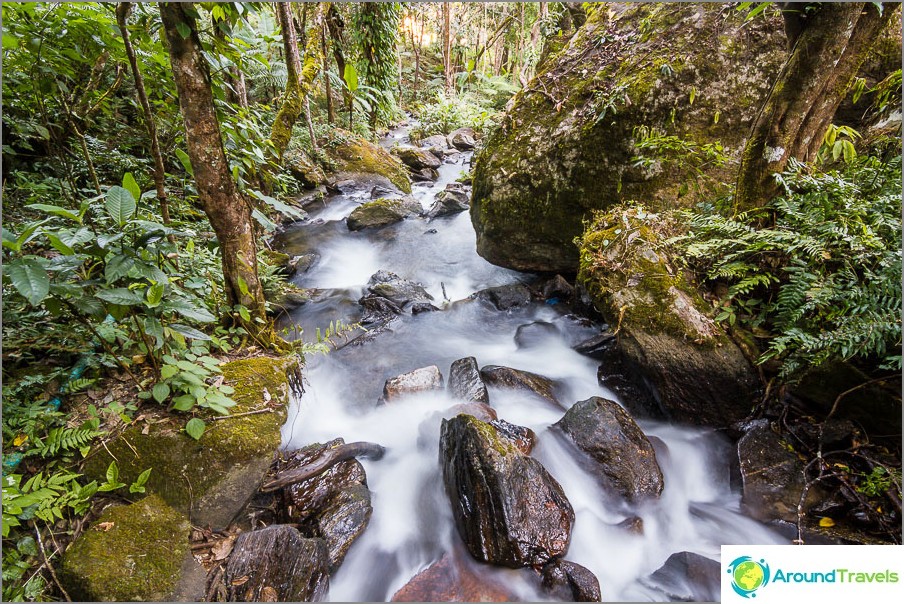
Exposure 3 sec - water like milk
Diaphragm
It is denoted as f22, f10, f5.6, f1.4 and means how open the lens aperture is when the shutter is released. Moreover, the lower the number, the larger the hole diameter, that is, as it were, the other way around. It is logical that the larger this hole, the more light enters the matrix. In automatic mode, the camera itself selects this value according to the program embedded in it..
The aperture also affects the depth of field (depth of field):
- If you are shooting a landscape during the day, then feel free to close the aperture to f8-f13 (no longer worth it) so that everything is sharp. In the dark, in the absence of a tripod, on the contrary, you will have to open it and raise the ISO.
- If you are shooting a portrait and want the most blurred background, then you can open the aperture to the maximum, but keep in mind that if your lens is fast, then the f1.2-f1.8 values may be too many and only the person's nose will be in focus, and the rest of the face blurred.
- There is a dependence of depth of field on aperture and focal length, therefore, in order for the main subject to be sharp, it makes sense to use f3-f7 values, increasing it depending on the increase in focal length.
Aperture f9 - everything is sharp
105mm, f5.6 - the background is very blurry
ISO sensitivity
It is designated ISO 100, ISO 400, ISO 1200, etc. If you shot on film, remember that films were sold with different sensitivities, which meant the film's sensitivity to light. The same is for a digital camera, you can set the sensor's light sensitivity. In practice, this means that your frame will be brighter as the ISO is increased, with the same shutter speed and aperture settings (at the same exposure)..
A feature of good and expensive cameras is a higher working ISO, reaching up to 12800. Now this figure does not tell you anything, but it's really cool. Because at ISO 100, you can only shoot in daylight, and setting 1200 and higher is already not a hindrance to twilight. Budget DSLRs have a maximum working ISO of about 400-800. Next comes color noise. Pull the ISO all the way up and shoot at dusk and you'll know what this is about. Soap dishes with this parameter are really bad..
ISO 12800 - noticeable noise, but it can be partially removed during processing
ISO 800 with the same settings, the photo is much darker
White balance
Surely you have seen photos where there is too much yellowness or blue? This one is just because of the wrong white balance. The fact is that depending on the light source (sun, incandescent lamp, white light lamp, etc.), the color spectrum of the photo depends. Roughly speaking, imagine that we will shine a special blue lamp on the chair and then the whole photo of this chair will be cyanotic. If this is a special artistic effect, then everything is fine, but if we want normal shades, then setting the white balance will save us. All cameras have presets (automatic, sun, cloudy, incandescent, manual, etc.).
To my shame I must admit that I always shoot with the machine. It's easier for me to tweak everything in the program later than to set the white balance. Perhaps someone will consider this blasphemy, but everything suits me, and I think most will suit too, so I will not talk about manual white balance.
Focus point selection
As a rule, all good cameras have the ability to select a focus point, as well as their automatic selection (when the camera itself selects objects and decides on what to focus on and how). I rarely use the automatic mode, mainly when there is little time and objects are moving, for example, in a crowd of people, when there is no time for thought. In all other cases, I use the center point. I pressed the button, focused without releasing the button, took it to the side, and pushed it to the end, taking a shot.
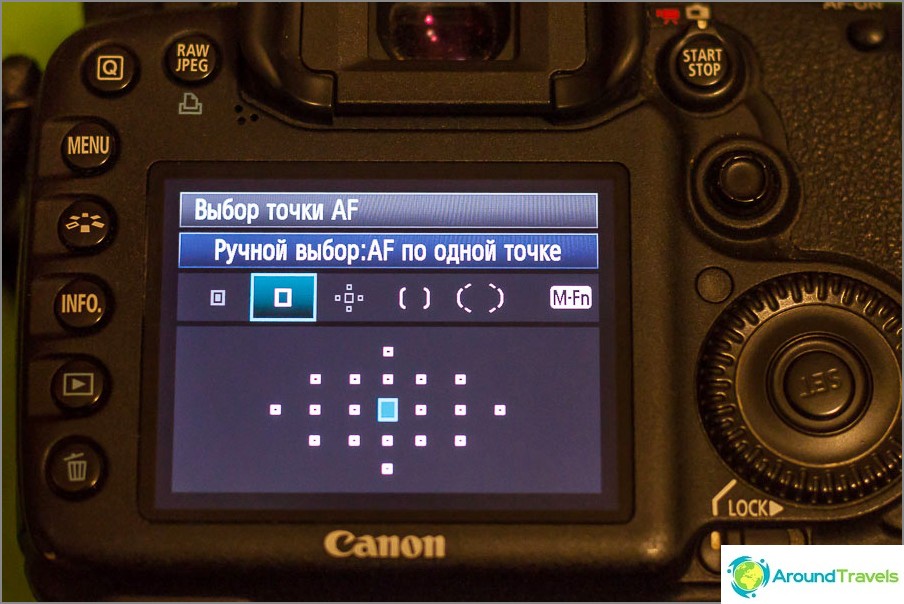
Single-point focus selection (center)
The center point is usually the most accurate, which is why it should be used. But it is necessary to look at a specific model of the camera, for example, now all points are working on my current camera. I also wanted to say that if your camera dulls and focuses poorly (twilight, backlight), then you need to look for the border of light and dark and focus on it.
Backlit is easiest to focus on the border of the hair.
Depth of field DOF
Depth of field is the range of distances in which all objects will be sharp. Let's imagine that you are photographing a person and there is a straight line: camera - person - background. The focus point is on a person, then everything will be sharply in the range from this person to you for a certain number of meters and from this person towards the background also for a certain number of meters. This range is the depth of field. In each case, it will be different, because it depends on several parameters: aperture, focal length, distance to the object, and on the model of your camera. There are special calculators of depth of field where you can enter your values and find out what distance you get. For landscapes, you need a large depth of field for everything to be sharp, and for portraits or highlighting objects using background blur, you need a shallow depth of field..
You can play around with the calculator to understand a little the relationship of these parameters. But in the field you will not have it at hand, therefore, if you are not a professional photographer, then it will be enough to remember some values convenient for you, and also every time to look on the display (zooming in on the photo), what did you get and whether you need take a photo.

Digit 5 focusing, cutting only 4-5-6 lane
First of all, you need to remember that:
- The more the aperture is open, the shallower the depth of field.
- The longer the focal length, the shallower the depth of field.
- The closer the subject, the shallower the depth of field.
That is, when shooting at close range, for example, a person's face at 100 mm and an aperture of 2.8, you risk getting only a sharp nose, while the rest will be blurry..
73mm, f5.6, shot as close as possible, so only the finger is in focus
You will need to experience this «triple» the dependence of the depth of field on the focal length, aperture and distance for the subject. For example:
- When photographing a landscape or other subject at a wide angle, you can always use f8-f13 and everything will be sharp. In fact, the calculator says that you can open the aperture much wider, but I like these values. As a rule, I always bet f10 (during the day).
- For a beautiful blurred background, you do not need to have an expensive high-aperture lens with which you can greatly open the aperture, a normal zoom with a standard aperture is enough, you just need to move away and zoom in on a person (for example, 100 mm) and then even f5.6 is enough for you to blur background.
- The distance from the subject of photography to the background plays a role. If they are very close, then it may not work normally to blur the background, you will have to use a long focal length and a very open aperture. But if the background is very far away, then it will almost always turn out to be blurry..
- If you are photographing a flower at close range, and for some reason you need to sharpen the mountains on the horizon, then you will have to clamp the aperture down to f22 or more. True, in this case, there is a chance to get a not sharp image anyway due to other features..
Alternatively, you can just remember a couple of things. We shoot landscapes and similar plans at f10, people and select objects at f2.5 (50 mm) or f5.6 (105 mm).
Relationship between shutter speed, aperture, ISO and semi-auto modes
We got to the most difficult part, to the interconnection of all these parameters. I'll try to explain what's what, but you still can't do without trial. First of all, I want to advise you to use at the very beginning not a full manual mode (called M), but semi-automatic (Av and Tv for Canon, or A and S for Nikon), because it is much easier to think about one parameter, and not two at once.
So, I have already cited some relationships just above. And if it is rather difficult to understand the depth of field at the beginning, then choosing the shutter speed and aperture without reference to the depth of field will be easier. It all boils down to keeping your frame moderately light / dark, because even if you shoot in RAW, it's not a fact that you will be able to stretch the photo with too erroneous values. And that's why I'm in favor of semi-automatic modes.
Aperture priority (Av or A)
Let's say you are photographing a landscape in Av mode and your focal point is 24mm. Set f10, and the camera chooses the shutter speed for you. And all you have to do is to make sure that it is no longer than the critical value of 1 / mm (I wrote about this above in the Excerpt paragraph). What to do next?
- If the shutter speed is shorter than 1/24, for example 1/30 or 1/50, then everything is fine.
- If the shutter speed turns out to be slower than 1/24, then you will have to set a higher ISO.
- Further, if the ISO is not enough, then you can start opening the aperture. In principle, you can initially immediately open it at f5.6-f8, and then raise the ISO.
- If the maximum working ISO is already set and there is nowhere to open the aperture, then either «put your hands on your hips», to somehow reduce the jitter, either look for a surface where you can put or press the carcass, or take out a tripod. Alternatively, you can raise the ISO even higher, but then the photo will make a lot of noise..
Shutter Priority (Tv or S)
Moving objects or people are best shot in Tv mode to avoid blurring the subject. Naturally, the shorter the shutter speed, the better, but if there is little light, then you can focus on the values that I gave in the paragraph on shutter speed. That is, we set the shutter speed and control which aperture the camera will choose. It is better that it is not fully open, especially with fast lenses. If there is not enough light, then we also increase the ISO, if it is still not enough, then we try to lengthen the shutter speed..
ISO 1600 f2.8 1/50 sec - parameters at the limit, because it is dark and moving
Exposure compensation
Av and Tv are also convenient for this. Since the camera measures the exposure using the focus point, and it may be in the shade, or, on the contrary, it is too illuminated, the selected aperture or shutter speed values may not correspond to the required ones. And the easiest way to correct them is using exposure correction, just turn the wheel 1-3 steps in the right direction and that's it, that is, if you need to make the whole frame darker, then in a minus, if lighter, then in a plus. In low light, I always immediately shoot at -2/3 negative in order to have a greater margin of settings..
P.S. I hope the article turned out to be not too difficult and readable. There are many nuances, but it is difficult to place them here, given that I myself do not know many things. If you find an error, write in the comments..