I got to the last article related to photography, hurray! On the topic of processing, there are many holivars on the network: both, regarding what it should / should not do, and regarding how exactly to do it. My view on this topic is based on what result I personally want to get and at what cost. To clarify: first of all, I shoot for the blog and for my family archive, that is, I do not directly earn my living with photographs. Plus, I can't spend too much time on them, otherwise I won't have time to work, after all, I have to process a lot of photos. I have 2-3 articles per week on my site, each with about 20-40 photos. On the other hand, I also cannot release completely unprocessed ones, they are faded (because RAW), there are often too bright or too dark areas, and so on, and I myself do not like such photos. That is, it would probably be possible to upload any, but this is not my option.
The content of the article
- one All parts of my Beginner Photographers FAQ
- 2 How I process photos in Lightroom
- 3 About resize in Wordrpess
- 4 How do I store photos
- five Where to backup photos
All parts of my Beginner Photographers FAQ
one. Which camera to choose for a novice photographer
2. What lens is needed for what and what to choose
3. Basic Digital Camera Settings
4. How to take travel photography
5. How to process photos in Lightroom and how to store them
6. Example of a photo bag and travel backpack
7. How to photograph the starry sky
0. What I photograph when traveling
How I process photos in Lightroom
Thus, I am a supporter of shallow processing due to the lack of motivation to spend a lot of time on it, and I do not see much of a difference for myself yet. Of course, occasionally I can conjure a little longer, but this «masterpiece» all the same then there is nowhere to go. Now all the processing takes place in Lightroom, and I have already forgotten other programs when I used it. So if you're with Photoshop’Oh, and you prefer to process photos quite strongly, then in the post you are unlikely to find something worthwhile for yourself 🙂
As I said, all of the processing is done in Lightroom, and it's pretty simple. In fact, I only crop and flatten the horizon, draw out shadows and darken highlights, add color and sharpness..
Photo import and presets
I insert the flash drive from the camera into the card reader and import the photo with transfer to an external hard drive. I will write about storing photos below. When importing, I use the pre-created presets: Clarity-Detail-Noise-Lens and NewA6500. Now I use only the latter (I have a Sony A6500), it has more settings for my camera and for how I shoot. There are also a couple for the phone and a second camera..
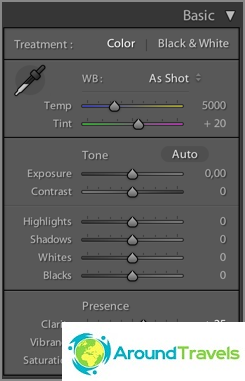
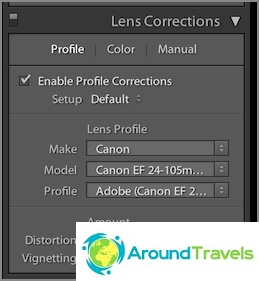
But the presets are very similar, they differ a little only in the settings of shadows, highlights and exposure, and I constantly adjust them, since my opinion changes, then once again I try to adjust the settings for most photos in order to process them less. Some of the repeating settings: Clarity +25, Vibrance +25, Sharpening +60, Noise Reduction Luminance +65, Enable Lens Correction. The latter is quite important, as it adjusts the photo (mainly geometric distortions are removed) to your lens. But this is in case Lightroom knows your camera. For example, for Canon G7xm2 I then have to manually select something similar to it.
Regarding presets, I want to say right away that there is no right or wrong here. Well, if we talk about amateurs, the pros are different, although they may have a special author's style. Therefore, you can create a preset for yourself with any settings you like, and it will be right. After all, the main thing is that it suits you, you process them, simply because «I see so». Here, of course, you can argue, I do not insist 🙂 It's never too late to read about professional processing, how gurus suggest using this or that setting, and change your presets.
I do not rename the files, I leave them as they are.
After applying the preset on import
After applying the preset on import
After applying the preset on import
Photo thinning
The next step after import and before processing is decimation. I usually delete: photos that are blurry, duplicates (when about 20 photos of the same object were taken), all photos with a marriage (too dark, too light, etc.), just photos that I don't like. Sometimes I can leave with marriage, if there is nothing like this, but the photo is very necessary.
But in general, after a couple of years of photography, I began to spend much less time on thinning and thin out less carefully, at first I left almost 50% somewhere. It's easier to change hard drives to larger ones and buy new ones than to sit for several days and thin out. Moreover, my archive is not growing so fast. Plus, besides, more than once there was such a moment that suddenly a remote photo was needed, albeit a defective one..
Thinning occurs also in Lightroom, I mark the photo as Rejected with the X key, then I delete all marked ones at once..
Cropping and aligning the horizon
At first, I did framing very often, then apparently I took aim and I build a normal composition already at the stage of photographing. The article How to take photographs while traveling I said that I use the rule of thirds, so when cropping, I use it in the same way. Not fanatical.
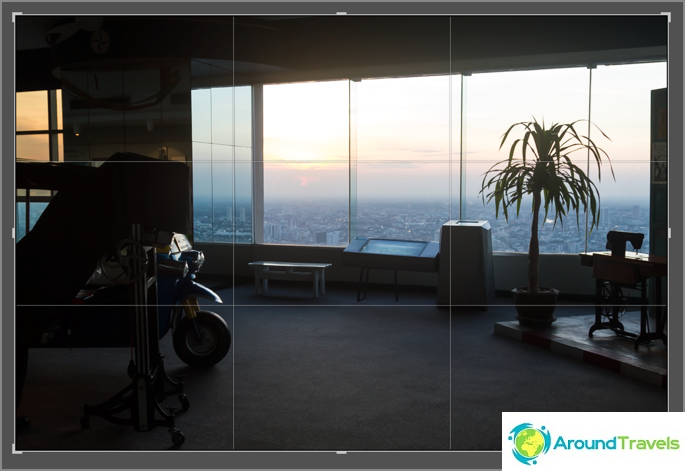
Crop and align the horizon, if you didn't do it when shooting
White balance
Since I always take pictures with automatic white balance, I correct it in the eye program using the Temp and Tint levers. I mostly use the first, the second less often. Sometimes you can use Auto to get Lightroom's opinion. By the way, it is difficult to correct colors on ordinary monitors, because they are not calibrated, and the matrices themselves have poor color rendition. That is, you will do as you see fit, but other users will see everything in a completely different way..
Do I have a Macbook Pro 15 now? with Retina display. I consider it, of course, not a reference, but very good in terms of color rendition. Also 15 inches of dual resolution is enough for me to process photos..
Stretching shadows and darkening highlights
Since many photographs have some dynamic range issues, processing can reduce them. To do this, I lighten the shadows with the Shadows lever (move to the plus), then darken the too bright Highlights (move to minus). I adjust the resulting result Exposure (plus or minus, depending on the situation) and often also adjust White and Blacks. Yes, and I almost forgot, I add Contrast, because when the shadows are lightened, it is lost, and from time to time I add Clarity (up to 50), increasing the micro contrast. Although usually the contrast and micro-contrast are immediately set by the preset when importing to the fixed values I need (+10 and +25, respectively).
I personally like micro-contrast photos more than contrast or sharpened ones. Therefore, sometimes I even take Shadows away a lot, and then increase Clarity even more. How watchable it is for you, you decide for yourself. Well, I often do contrast not at the expense of Contrast, but at the expense of White and Blacks, so it turns out to adjust it more accurately, because they are regulated with «two sides».
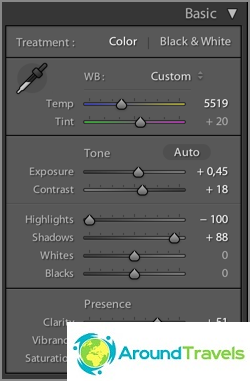
What settings turned out in the end
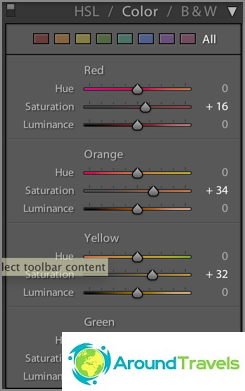
Adding color
Previously, I used 2 presets: Blue Sky 0.5 (download), or Skin toning lighter (download). The first preset was spied on by Sergey Doli (it was called Matts Blue Sky 1), but I slightly altered it, reduced the parameter changes by half. The second one I don't remember where I downloaded it. So, now I already have Blue Sky 0.5 «sewn up» to the preset on import, so I cut my processing steps a little more.
Blue Sky is needed to increase the blueness of the sky, but for this it should not be too much overexposed (otherwise it will be useless), and to increase the saturation of yellow and orange colors. It is important to mention that sometimes you need to set Luminance back to zero for blue color, otherwise the blue does not come out natural.
Skin toning changes the balance of light, making the skin tone more realistic. But the truth and everything around also changes the balance, not just the skin. So let's say, for lovers of warm shades and lamp-like.
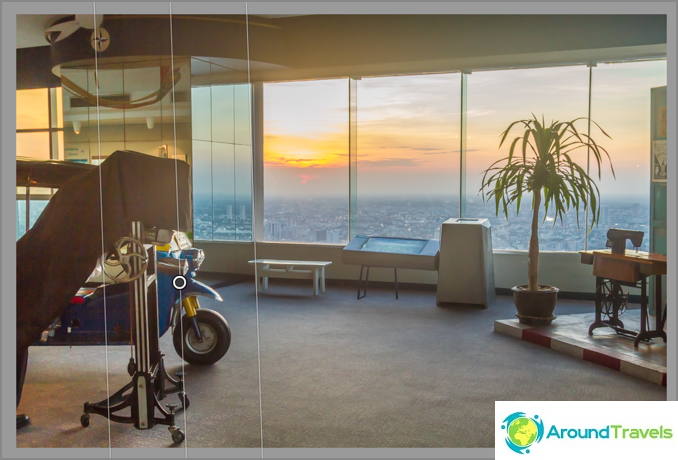
After applying the Blue Sky 0.5 preset
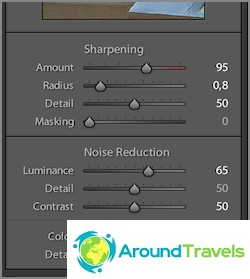
Sharpening and noise reduction
Since all photos go either to the blog or to Instagram, that is, the photos will be viewed only from the screen, and not in the maximum resolution, but about 1000 px in width, the sharpness can be painlessly raised in the program. Sharpness is also set by the preset during import (+60). Depending on the photo, I can reduce the Sharpening values to avoid excessive sharpness or noise. Actually, I also neutralize noise when importing, and then I rarely touch the Luminance lever (+65). Basically, you have to reduce Sharpening and Luminance for jpegs received from a soap dish or a smartphone.
And again, I will mention the Clarity tool here. In fact, it also sharpens the photo..
Using additional tools
More often than not, I use a gradient filter to lighten / darken a part of a photo, or change the contrast or white balance of a specific part of a photo. Sometimes it is better to use a brush instead, which is more convenient when you need to change a complex area, for example, a face, on which, on the contrary, you need to remove Clarity (otherwise it will be too structural). In the latest versions of Lightroom, these tools have much more customization, you can change anything in the selected area..
Less often I use a stamp to remove some kind of garbage from a photo..
Using a gradient filter to brighten an area
Export
After I have processed the image, I set the flag (Set Flag -> Flagged) with the P key.This will allow after I finish with all the images, display only them using the filter (Filter by flag -> Flagged only), view once again only for processed images and export them all in bulk. For each article, I usually process about 20-40 photos..
I have already created a special preset for export. The folder for export, the size of the exported jpeg (2048 × 2048), its quality (75%), sharpness during export (High), saving meta data, watermark (configurable and saved as a preset) are selected in it. For Instagram I make 100% quality, I don't add watermark.
Final result
In fact, in the example above, there was some attempt to expand the dynamic range (if you expand it strongly, then there will already be a pseudo HDR). Naturally, it is not always necessary to carry out just such manipulations with photographs, but usually they are very similar: adjusting the blue / yellow balance, lightening shadows, darkening bright areas, increasing contrast. It's just that when there is not such a big difference between the dark and light areas, then the levers will not need to be moved to extreme positions, but only a little bit and this is done, of course by eye.
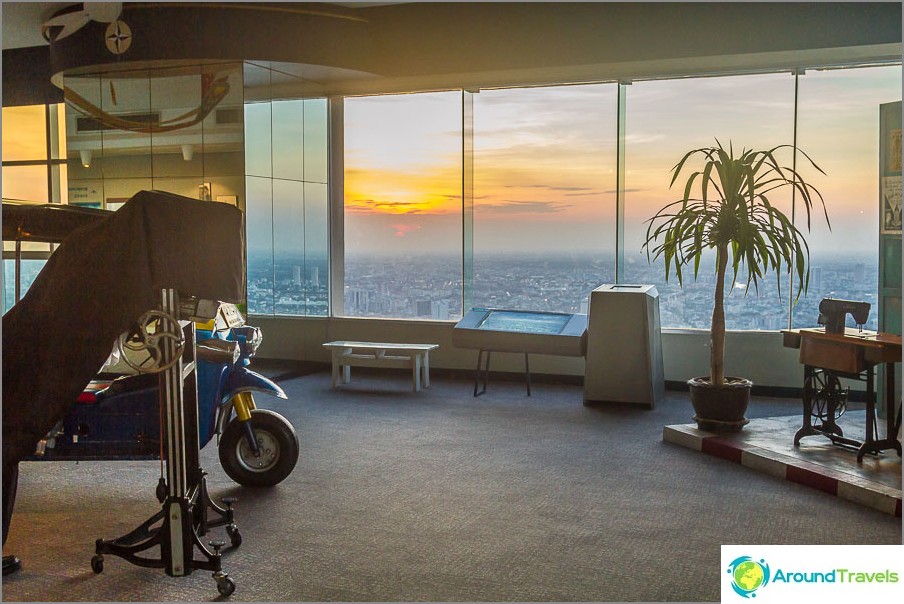
Final result after processing
Why Lightroom
It's simple, it just happened. I tried and I liked this program. It is great for correcting photos, not for deep editing them. Here everything is exactly for this and is done, there are all the tools. Plus, I also have the whole library of photos in it, and you can quickly find everything you need: there are a bunch of different filters, you can set tags for photos (I really don't use this at all).
There are plenty of analogues, but I don't want to try anything yet, everything suits.
About resize in Wordrpess
I can't help but mention one thing that can be important for bloggers of the WordPress platform. I upload photos to the blog with a size of 2048px in width, but in the post they are displayed at a size of 800 px (full size on click, the photo is shown in a lightbox). If you upload full-size photos on your blog, and the engine resizes them to the size you need, then this is not an idea, if quality is important to you, of course. The fact is that the built-in resize will spoil the sharpness quite a lot, the photo turns out to be blurry. However, few visitors will notice this, unless you have a portfolio of a photographer offering your services. Well, there may not be enough space on the hosting, since a full-size JPG can easily take up 10 megabytes..
Alternatively, use the Sharpen Resized Images plugin, it will add sharpness when resizing, but it does it quite roughly too..
How do I store photos
All photos, videos and other files are stored on the Seagate 4TB external portable hard drive, because they do not fit on the laptop drive. This disc is always with me. The photo archive now takes up about 1.5 TB (2017), which is actually not very much if you are a photographer or blogger and shoot a lot. The file structure is shown in the screenshot below. As a rule, for each trip there is a separate folder, inside which there are 2-3 more folders for each of the cameras. But if the trip is long and in different cities, then for each city its own folder is also created.
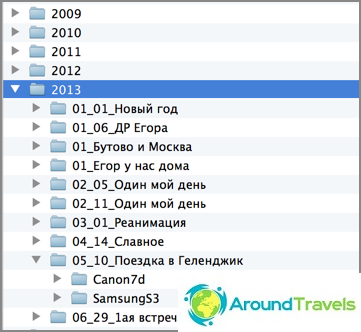
Hard disk folder structure
The folders have the following structure: Year / Month_Number_Name of the Event / Shooting device. The directory structure in Lightroom is exactly the same. And what is convenient, you can put a photo in any of the folders on the disk, and then synchronize this folder in Lightroom, and the photo will appear in the program. For me, such a structure is quite convenient for storage, and does not take additional time for cataloging, I did it once and that's it. Now there is simply a trend to lump everything together, and only then the program itself distributes the photos according to different criteria. I like this option less.
I keep the photo in the originals, that is, in RAW, so that I can make what I need from the photo at any time. And in Lightroom, in my settings, it is worth saving all information about the photo to XMP files. Indeed, during RAW processing, nothing happens to the file itself, all information about the actions taken is stored in the catalog file. So XMP is a duplicate of information for each photo, it weighs quite a bit, so the total volume is not particularly increased. Due to XMP files, transferring photos to other computers is simplified and this is some kind of protection against the fact that something happens to the catalog file, there were already precedents, it was necessary to delete it.
Where to backup photos
In addition to how to store photos, it is important where else to backup them. First, you need to remember the golden rule that there should be 2 backups. As I said, all my photos are stored on an external hard drive, that is, this is the main database, and 2 more backups (copies) need to be made to it. Your main base can also be on a hard laptop, it is more convenient.
I make the first backup to another external hard drive. About once every 3 months (and before each trip) I make a complete copy from one external (main) to the second (backup). So that it does not take time, I set to copy at night, and in the morning everything is ready. I do not take the second hard drive on trips, that is, the risk of ditching it is minimal.
I make the second backup to the cloud from the main hard, specifying the folder with the base as a folder for the cloud. For now, I use the Mail.RU cloud service, since in 2014 they had a promotion and they gave 1TB for life. But this place was no longer enough for me, plus I do not like the download speed, and the fact that the storage is not very reliable, there was already a case when they deleted some of the files for me. Therefore, I want to move to Dropbox, which is currently considered the most functional and secure. There is a good paid tariff with no space restrictions. In principle, I already use it, store important files, but for now it is a free plan.
And one more important, as it seems to me, point. Since on all trips I take only one external hard drive, where the main database is stored, that is, the risk of ditching it. This is not scary, since a copy is stored at home, but you can lose photos from current trips if you constantly transfer them from a flash drive to your main drive. So, if possible, I leave all the files on the flash drive, and do not delete them immediately after transferring them to the hard drive. Yes, for this you need a larger volume of flash drives (or several pieces) so that they are enough for the whole trip, but there is a guarantee. Also, if the trip has good Internet at the hotel, then the files also fly to the cloud..
P.S. That's all I can tell you about photo processing and storage. Not a lot, but that is 🙂